
Spring Boot Apache Kafka
本教程演示了如何从Spring Kafka发送和接收消息。 首先创建一个Spring Kafka Producer,它能够将消息发送到Kafka主题。 接下来创建一个Spring Kafka Consumer,它能够收听发送给Kafka的消息。使用适当的键/值序列化器和反序列化器来配置它们。 最后,使用简单的Spring Boot应用程序演示应用程序。
下载并安装Apache Kafka
要下载并安装Apache Kafka,请阅读此处的官方文档。本教程假定使用默认配置启动服务器,并且不更改任何服务器端口。
注意:在使用 Kafka 之前,需要安装好
项目设置
Spring Kafka:2.1.4.RELEASESpring Boot:2.0.0.RELEASEApache Kafka:kafka_2.11-1.0.0Maven:3.5
项目结构
请参考以下项目结构来构建项目。
Maven依赖
在这个项目中,使用Apache Maven来管理项目依赖项。确保以下依赖项存在于类路径上。
<?xml version="1.0" encoding="UTF-8"?>
<project xmlns="http://maven.apache.org/POM/4.0.0"
         xmlns:xsi="http://www.w3.org/2001/XMLSchema-instance"
         xsi:schemaLocation="http://maven.apache.org/POM/4.0.0
                             http://maven.apache.org/xsd/maven-4.0.0.xsd">

    <modelVersion>4.0.0</modelVersion>
    <groupId>com.yiibai.spring.kafka</groupId>
    <artifactId>producer-consumer</artifactId>
    <version>1.0.0-SNAPSHOT</version>
    <url>http://www.yiibai.com/spring-boot/</url>
    <name>Spring Kafka - ${project.artifactId}</name>

    <parent>
        <groupId>org.springframework.boot</groupId>
        <artifactId>spring-boot-starter-parent</artifactId>
        <version>2.0.0.RELEASE</version>
    </parent>

    <properties>
        <java.version>1.8</java.version>
        <project.build.sourceEncoding>UTF-8</project.build.sourceEncoding>
        <spring-kafka.version>2.1.4.RELEASE</spring-kafka.version>
    </properties>

    <dependencies>
        <dependency>
            <groupId>org.springframework.boot</groupId>
            <artifactId>spring-boot-starter</artifactId>
        </dependency>
        <dependency>
            <groupId>org.springframework.kafka</groupId>
            <artifactId>spring-kafka</artifactId>
            <version>${spring-kafka.version}</version>
        </dependency>
        <dependency>
            <groupId>org.springframework.boot</groupId>
            <artifactId>spring-boot-starter-test</artifactId>
            <scope>test</scope>
        </dependency>
        <dependency>
            <groupId>org.springframework.kafka</groupId>
            <artifactId>spring-kafka-test</artifactId>
            <version>${spring-kafka.version}</version>
            <scope>test</scope>
        </dependency>
    </dependencies>

    <build>
        <plugins>
            <plugin>
                <groupId>org.springframework.boot</groupId>
                <artifactId>spring-boot-maven-plugin</artifactId>
            </plugin>
        </plugins>
    </build>

</project>
Spring Kafka将消息发送到主题
这个项目是从发送消息开始,使用KafkaTemplate类来包装Producer并提供高级操作以将数据发送到Kafka主题。 提供异步和同步方法,异步方法返回Future。
package com.yiibai.kafka.producer;

import org.slf4j.Logger;
import org.slf4j.LoggerFactory;
import org.springframework.beans.factory.annotation.Autowired;
import org.springframework.beans.factory.annotation.Value;
import org.springframework.kafka.core.KafkaTemplate;
import org.springframework.stereotype.Service;

@Service
public class Sender {

    private static final Logger LOG = LoggerFactory.getLogger(Sender.class);

    @Autowired
    private KafkaTemplate<String, String> kafkaTemplate;

    @Value("${app.topic.foo}")
    private String topic;

    public void send(String message){
        LOG.info("sending message='{}' to topic='{}'", message, topic);
        kafkaTemplate.send(topic, message);
    }
}
使用ProducerFactory的实现来配置KafkaTemplate,更具体地说是DefaultKafkaProducerFactory。可以使用Map <String,Object>初始化这个生产者工厂。使用从ProducerConfig类中获取键。
-
ProducerConfig.BOOTSTRAP_SERVERS_CONFIG指定用于建立与Kafka群集的初始连接的主机/端口对列表。客户端将使用所有服务器,而不管此处指定哪些服务器进行引导/此列表仅影响用于发现整套服务器的初始主机。此列表应采用host1:port1,host2:port2,....的形式。由于这些服务器仅用于初始连接以发现完整的集群成员资格(可能会动态更改),因此此列表不需要包含完整集 服务器(但是,如果服务器关闭,可能需要多个服务器)。 -
ProducerConfig.KEY_SERIALIZER_CLASS_CONFIG指定用于实现org.apache.kafka.common.serialization.Serializer接口的键的序列化程序类。 -
ProducerConfig.VALUE_SERIALIZER_CLASS_CONFIG指定用于实现org.apache.kafka.common.serialization.Serializer接口的值的序列化程序类。
有关配置选项的完整列表,请查看ProducerConfig类。
package com.yiibai.kafka.producer;

import org.apache.kafka.clients.producer.ProducerConfig;
import org.apache.kafka.common.serialization.StringSerializer;
import org.springframework.beans.factory.annotation.Value;
import org.springframework.context.annotation.Bean;
import org.springframework.context.annotation.Configuration;
import org.springframework.kafka.core.DefaultKafkaProducerFactory;
import org.springframework.kafka.core.KafkaTemplate;
import org.springframework.kafka.core.ProducerFactory;

import java.util.HashMap;
import java.util.Map;

@Configuration
public class SenderConfig {

    @Value("${spring.kafka.bootstrap-servers}")
    private String bootstrapServers;

    @Bean
    public Map<String, Object> producerConfigs() {
        Map<String, Object> props = new HashMap<>();
        props.put(ProducerConfig.BOOTSTRAP_SERVERS_CONFIG, bootstrapServers);
        props.put(ProducerConfig.KEY_SERIALIZER_CLASS_CONFIG, StringSerializer.class);
        props.put(ProducerConfig.VALUE_SERIALIZER_CLASS_CONFIG, StringSerializer.class);
        return props;
    }

    @Bean
    public ProducerFactory<String, String> producerFactory() {
        return new DefaultKafkaProducerFactory<>(producerConfigs());
    }

    @Bean
    public KafkaTemplate<String, String> kafkaTemplate() {
        return new KafkaTemplate<>(producerFactory());
    }

}
Spring Kafka监听来自主题的消息
接下来,将演示如何从Kafka主题中收听消息。 Receiver类将使用Kafka主题消息。创建一个Listen()方法并使用@KafkaListener注释对其进行了注释,该注释将该方法标记为指定主题上的Kafka消息侦听器的目标。
package com.yiibai.kafka.consumer;

import org.slf4j.Logger;
import org.slf4j.LoggerFactory;
import org.springframework.kafka.annotation.KafkaListener;
import org.springframework.messaging.handler.annotation.Payload;
import org.springframework.stereotype.Service;

@Service
public class Receiver {

    private static final Logger LOG = LoggerFactory.getLogger(Receiver.class);

    @KafkaListener(topics = "${app.topic.foo}")
    public void listen(@Payload String message) {
        LOG.info("received message='{}'", message);
    }

}
此机制需要在其中一个@Configuration类和侦听器容器工厂上使用@EnableKafka注释,该工厂用于配置基础ConcurrentMessageListenerContainer。使用SenderConfig类中相同类型的键/值反序列化器。
-
ConsumerConfig.GROUP_ID_CONFIG指定一个唯一字符串,用于标识此使用者所属的组。 -
ConsumerConfig.AUTO_OFFSET_RESET_CONFIG指定当Kafka中没有初始偏移量或服务器上当前偏移量不再存在时要执行的操作(例如,因为该数据已被删除):-
earliest: 自动将偏移重置为最早的偏移量 -
latest: 自动将偏移重置为最新的偏移量 -
none: 如果没有找到消费者组的先前偏移量,则向消费者抛出异常 -
anything else: 向消费者抛出异常。
-
消费者使用消费者组名称标记自己,并且发布到主题的每个记录被传递到每个订阅消费者组中的一个消费者实例。 消费者实例可以在单独的进程中,也可以在不同的机器。
如果所有使用者实例具有相同的使用者组,则记录将有效地在使用者实例上进行负载平衡。 如果所有消费者实例具有不同的消费者组,则每个记录将被广播到所有消费者进程。
有关配置选项的完整列表,请查看ConsumerConfig类。
package com.yiibai.kafka.consumer;

import org.apache.kafka.clients.consumer.ConsumerConfig;
import org.apache.kafka.common.serialization.StringDeserializer;
import org.springframework.beans.factory.annotation.Value;
import org.springframework.context.annotation.Bean;
import org.springframework.context.annotation.Configuration;
import org.springframework.kafka.annotation.EnableKafka;
import org.springframework.kafka.config.ConcurrentKafkaListenerContainerFactory;
import org.springframework.kafka.config.KafkaListenerContainerFactory;
import org.springframework.kafka.core.ConsumerFactory;
import org.springframework.kafka.core.DefaultKafkaConsumerFactory;
import org.springframework.kafka.listener.ConcurrentMessageListenerContainer;

import java.util.HashMap;
import java.util.Map;

@EnableKafka
@Configuration
public class ReceiverConfig {

    @Value("${spring.kafka.bootstrap-servers}")
    private String bootstrapServers;

    @Bean
    public Map<String, Object> consumerConfigs() {
        Map<String, Object> props = new HashMap<>();
        props.put(ConsumerConfig.BOOTSTRAP_SERVERS_CONFIG, bootstrapServers);
        props.put(ConsumerConfig.KEY_DESERIALIZER_CLASS_CONFIG, StringDeserializer.class);
        props.put(ConsumerConfig.VALUE_DESERIALIZER_CLASS_CONFIG, StringDeserializer.class);
        props.put(ConsumerConfig.GROUP_ID_CONFIG, "foo");
        props.put(ConsumerConfig.AUTO_OFFSET_RESET_CONFIG, "earliest");

        return props;
    }

    @Bean
    public ConsumerFactory<String, String> consumerFactory() {
        return new DefaultKafkaConsumerFactory<>(consumerConfigs());
    }

    @Bean
    public KafkaListenerContainerFactory<ConcurrentMessageListenerContainer<String, String>> kafkaListenerContainerFactory() {
        ConcurrentKafkaListenerContainerFactory<String, String> factory = new ConcurrentKafkaListenerContainerFactory<>();
        factory.setConsumerFactory(consumerFactory());
        return factory;
    }

}
使用 application.yml 配置应用程序
需要创建了一个application.yml 属性文件,该文件位于src/main/resources 文件夹中。 这些属性通过spring boot在配置类中注入。
spring:
  kafka:
    bootstrap-servers: localhost:9092

app:
  topic:
    foo: foo.t

logging:
  level:
    root: ERROR
    org.springframework.web: ERROR
    com.memorynotfound: DEBUG
运行应用程序
现在,编写一个简单的Spring Boot应用程序来演示应用程序。 为了使这个演示工作,需要前先在端口9092上运行localhost的Kafka服务器(Kafka的默认配置)。
package com.yiibai.kafka;

import com.yiibai.kafka.producer.Sender;
import org.springframework.beans.factory.annotation.Autowired;
import org.springframework.boot.CommandLineRunner;
import org.springframework.boot.SpringApplication;
import org.springframework.boot.autoconfigure.SpringBootApplication;

@SpringBootApplication
public class ProducerConsumerApplication implements CommandLineRunner {

    public static void main(String[] args) {
        SpringApplication.run(ProducerConsumerApplication.class, args);
    }

    @Autowired
    private Sender sender;

    @Override
    public void run(String... strings) throws Exception {
        sender.send("Spring Kafka Producer and Consumer Example");
    }
}
使用 Maven 命令构建项目:
mvn clean install
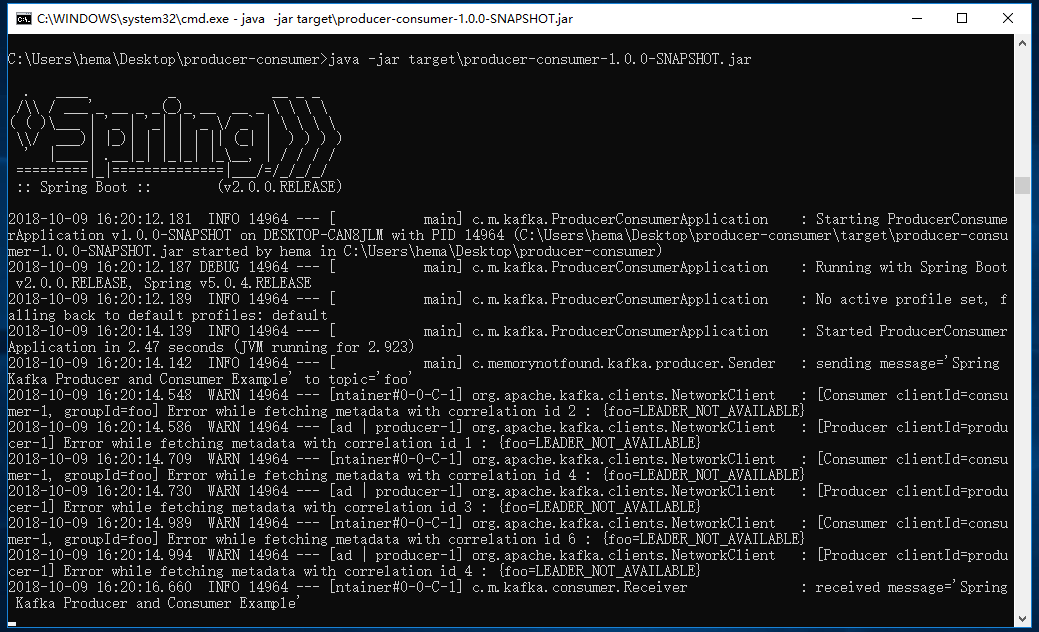
看到构建成功后,执行以下Java命令,运行Jar程序:
java -jar targetproducer-consumer-1.0.0-SNAPSHOT.jar
当运行应用程序时,应该会得到类似以下的结果: