
OpenCV添加文本
可以使用imgproc类的方法arrowedLine()将文本添加到图像。 以下是此方法的语法。
putText(img, text, org, fontFace, fontScale, Scalar color, int thickness)
该方法接受以下参数 -
-
mat - 表示要在其上绘制矩形的图像的
Mat对象。 - text - 表示要添加的文本的字符串变量。
-
org - 表示图像中左下角文本字符串的
Point对象。 - fontFace - 表示字体类型的整型变量。
-
fontScale - 类型为
double的变量表示与字体特定的基本大小相乘的缩放因子。 - color - 表示矩形颜色的标量对象(BGR)。
-
thickness - 表示矩形厚度的整数; 默认情况下,厚度值为
1。
示例
以下程序演示如何将文本添加到图像并使用JavaFX窗口显示它。
package yiibai.com;
import java.awt.image.BufferedImage;
import java.io.ByteArrayInputStream;
import java.io.InputStream;
import javax.imageio.ImageIO;
import javafx.application.Application;
import javafx.embed.swing.SwingFXUtils;
import javafx.scene.Group;
import javafx.scene.Scene;
import javafx.scene.image.ImageView;
import javafx.scene.image.WritableImage;
import javafx.stage.Stage;
import org.opencv.core.Core;
import org.opencv.core.Mat;
import org.opencv.core.MatOfByte;
import org.opencv.core.Point;
import org.opencv.core.Scalar;
import org.opencv.imgcodecs.Imgcodecs;
import org.opencv.imgproc.Imgproc;
public class AddingTextToImage extends Application {
Mat matrix = null;
@Override
public void start(Stage stage) throws Exception {
// Capturing the snapshot from the camera
AddingTextToImage obj = new AddingTextToImage();
WritableImage writableImage = obj.LoadImage();
// Setting the image view
ImageView imageView = new ImageView(writableImage);
// setting the fit height and width of the image view
imageView.setFitHeight(600);
imageView.setFitWidth(600);
// Setting the preserve ratio of the image view
imageView.setPreserveRatio(true);
// Creating a Group object
Group root = new Group(imageView);
// Creating a scene object
Scene scene = new Scene(root, 600, 400);
// Setting title to the Stage
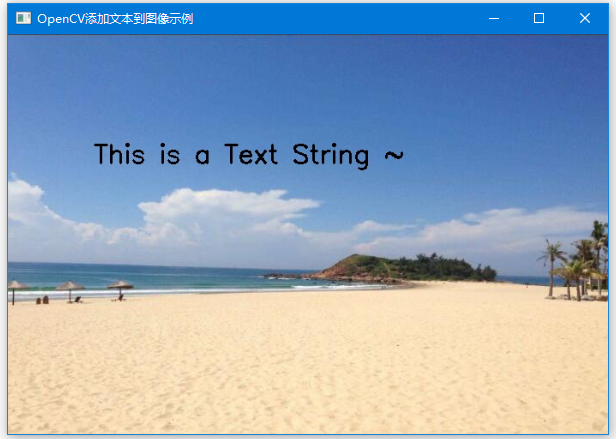
stage.setTitle("OpenCV添加文本到图像示例");
// Adding scene to the stage
stage.setScene(scene);
// Displaying the contents of the stage
stage.show();
}
public WritableImage LoadImage() throws Exception {
// Loading the OpenCV core library
System.loadLibrary( Core.NATIVE_LIBRARY_NAME );
// Reading the Image from the file and storing it in to a Matrix object
String file ="F:/worksp/opencv/images/sample2.jpg";
Mat matrix = Imgcodecs.imread(file);
String addText = "This is a Text String ~";
// Adding Text
Imgproc.putText (
matrix, // Matrix obj of the image
addText, // Text to be added
new Point(100, 150), // point
Core.FONT_HERSHEY_SIMPLEX , // front face
1, // front scale
new Scalar(0, 0, 0), // Scalar object for color
2 // Thickness
);
// Encoding the image
MatOfByte matOfByte = new MatOfByte();
Imgcodecs.imencode(".jpg", matrix, matOfByte);
// Storing the encoded Mat in a byte array
byte[] byteArray = matOfByte.toArray();
// Displaying the image
InputStream in = new ByteArrayInputStream(byteArray);
BufferedImage bufImage = ImageIO.read(in);
this.matrix = matrix;
//Creating the Writable Image
WritableImage writableImage = SwingFXUtils.toFXImage(bufImage, null);
return writableImage;
}
public static void main(String args[]) {
launch(args);
}
}
执行上面示例代码,得到以下结果 -